

- POS Admin User Manual
- 1. Sign in and find your way around
- 2. Recommended setup order
- 3. Product groups and items
- 4. Prices and price levels
- 5. Modifier groups and choices
- 6. Store settings
- 7. Ordering devices
- 8. Kitchen printers and product routing
- 9. User roles and users
- 10. POS, kiosk, and KDS settings
- 11. Tax configuration
- 12. Customer receipt text
- 13. Inventory counting
- 14. Item-level promotions
- 15. End-of-day reports and exports
- 16. Business Intelligence
- 17. Troubleshooting and support
LIMEORDER • SUPPORT • USER MANUAL
POS Admin User Manual #
Manage products, prices, stores, devices, staff permissions, receipts, inventory counts, promotions, and reports from LimeOrder’s browser-based back office.
Open POS Admin: posadmin.limeorder.com
This guide follows the POS Admin interface reviewed on October 4, 2026. Available menus depend on your account permissions and configuration. Restaurant-related options include modifiers, Kitchen Printer/KDS assignment, kitchen settings, and KDS timing controls. Use your own business account when following these steps. Screenshots show example records; your account may look different. Select any screenshot to enlarge it.
1. Sign in and find your way around #
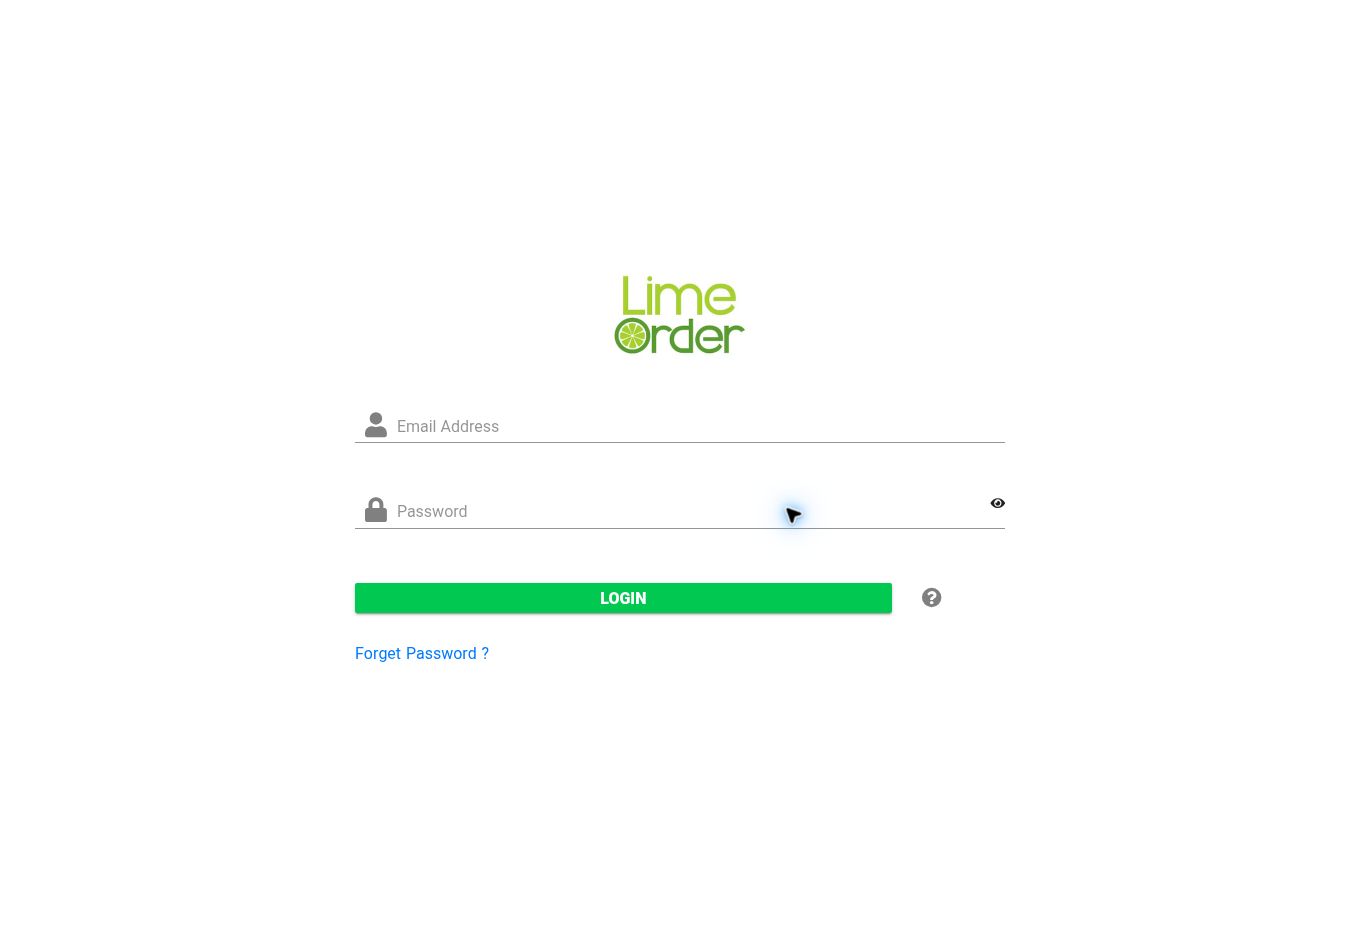
Sign-in screen: enter your own email address and password, then select Login. View full-size screenshot
- Open POS Admin in your browser.
- Enter your Email Address and Password.
- Select Login.
- If you cannot remember your password, select Forget Password ? on the sign-in screen and follow the recovery instructions.
After login, the left sidebar contains the main navigation. Select a section to reveal its child menus. The Search field at the top of the sidebar helps you find menu entries. The top bar also includes chat, User Manual, and Video.
| Section | What you will find |
|---|---|
| Easy | Shortcuts to Menu & Products, Dashboard, inventory counting, Modifiers, Stores, Ordering Devices, Payment Terminals, Kitchen Printers, users, roles, and receipts. |
| Base | Groups, Items, Businesses, Payments, Misc, Accounting, and Inventory Counting. The Items branch includes Items, Modifiers, Services, Units, and Warehouses. |
| Company | Stores, Devices, Shifts-Users, and Settings. |
| Daily | Item Level Promotions, Currency Equality, and Attendance. |
| Reports | Daily Report, Items, Lists, User/Employee, and Customer Statement. |
| Business Intelligence | Sales and Purchase analysis branches. |
| Other sidebar entries | Subscription & Buy, Support Tickets, Uber, Language, POS APP, About, and Logout. |
The Easy page shows an Easy Setup / Easy Access switch and pencil buttons beside the available shortcuts. Select the pencil beside a task to open it. Shortcut windows use Close to return to the Easy page.
Working with lists and forms #
Many screens have a record list and a detail form. Select the record you want before editing its details. Use the list’s search field and page controls when available. Add/New, Edit, Delete, and Save may appear as icon buttons. Product and modifier editors can include a Cancel button to leave without saving.
When a form has a Save button, use it to apply your changes. Before leaving a screen, check that you selected the intended record and saved the intended fields. Select Logout in the sidebar when finished.
2. Recommended setup order #
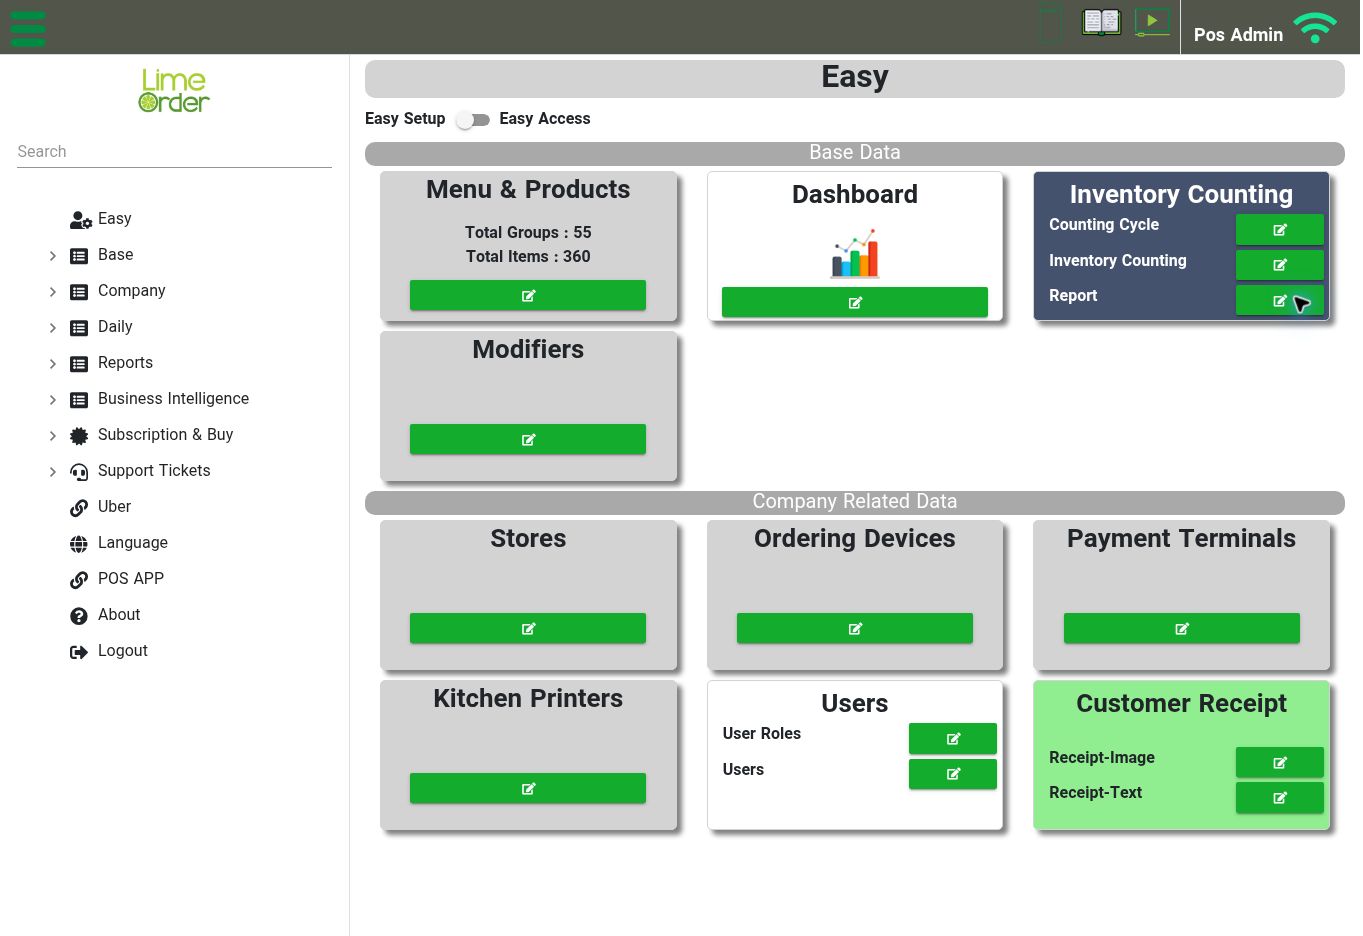
Easy Setup brings the main setup shortcuts together in one place. View full-size screenshot
Use this sequence when preparing a store. It helps establish the settings that later screens reference.
- Review the store name, time zone, contact details, and default tax set.
- Review tax configuration and any exemptions.
- Create product groups, then add products with their prices and units.
- For food service, create modifier choices and attach the relevant modifier groups to products.
- Define kitchen printer records and assign products to their Kitchen Printer/KDS destination.
- Review ordering devices and their store assignments.
- Set up user roles, then assign each user the appropriate role and location access.
- Review POS settings and customer receipt text.
- Check the resulting product, modifier, tax, and receipt behaviour in your configured POS before normal trading.
3. Product groups and items #
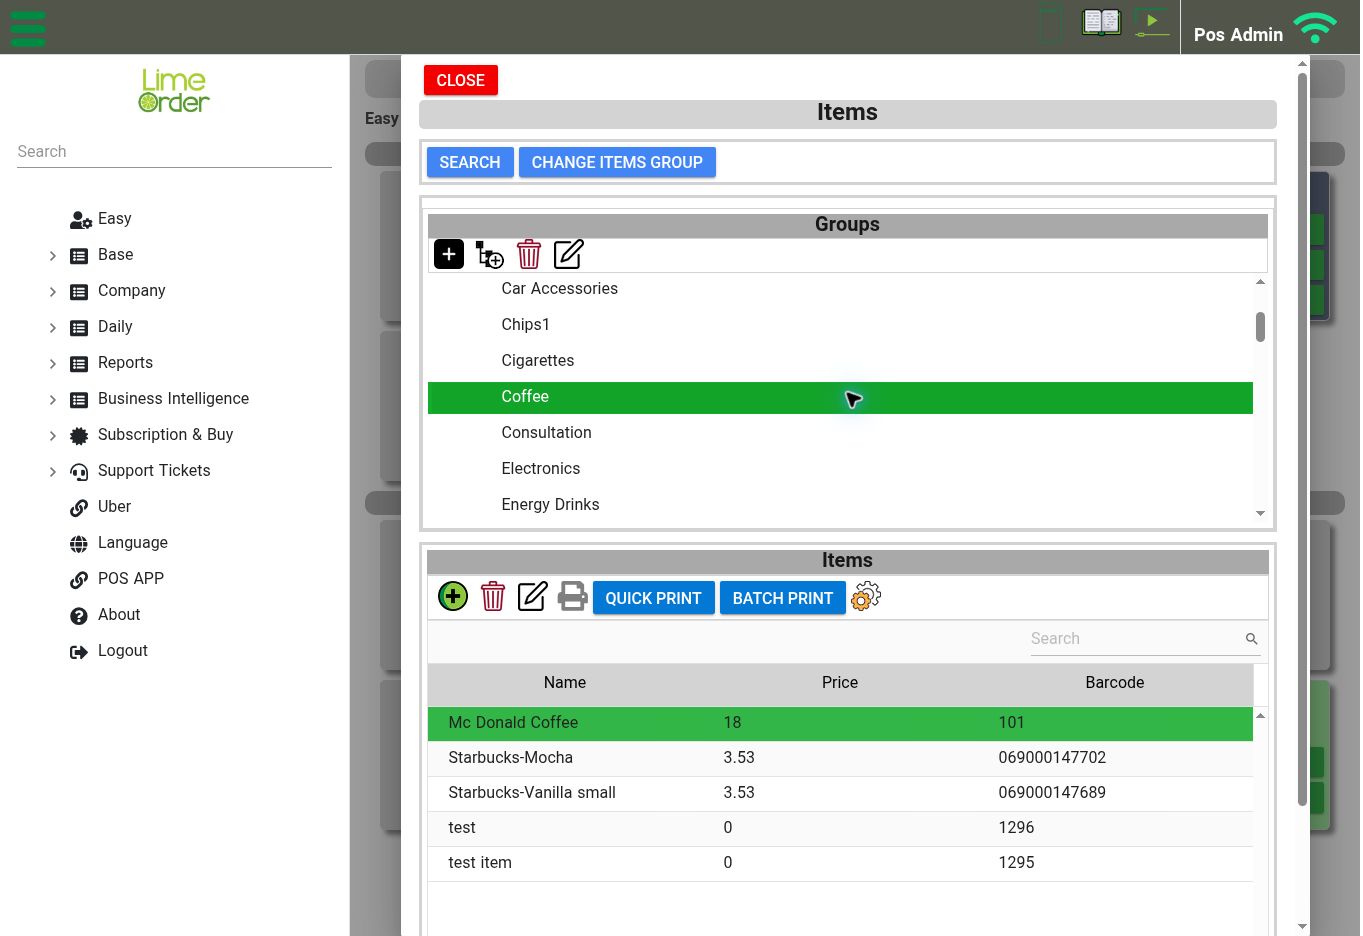
Select a product group to see its items and the Name, Price, and Barcode columns. View full-size screenshot
Open: Easy → Menu & Products, or Base → Items → Items
The Items screen has a Groups section and an Items list. Select a group to view its items. The list shows Name, Price, and Barcode.
Create or edit a product group #
- Use the group Add/New control to create a group, or select an existing group and use Edit.
- Complete the group form and save it.
- To create a subgroup, first select the intended parent group, then use the subgroup control.
Keep group names clear: for example, Appetizers, Main Courses, Drinks, or Desserts. The group toolbar also includes a Delete control; select the intended group carefully.
Add or edit an item #
- Select the product’s group.
- Use the item Add/New control, or select an existing item and use Edit.
- Complete the General tab using the fields below.
- Review the Price, Barcode, and Order Point tabs as needed.
- Select Save. Use Cancel to leave the editor without saving.
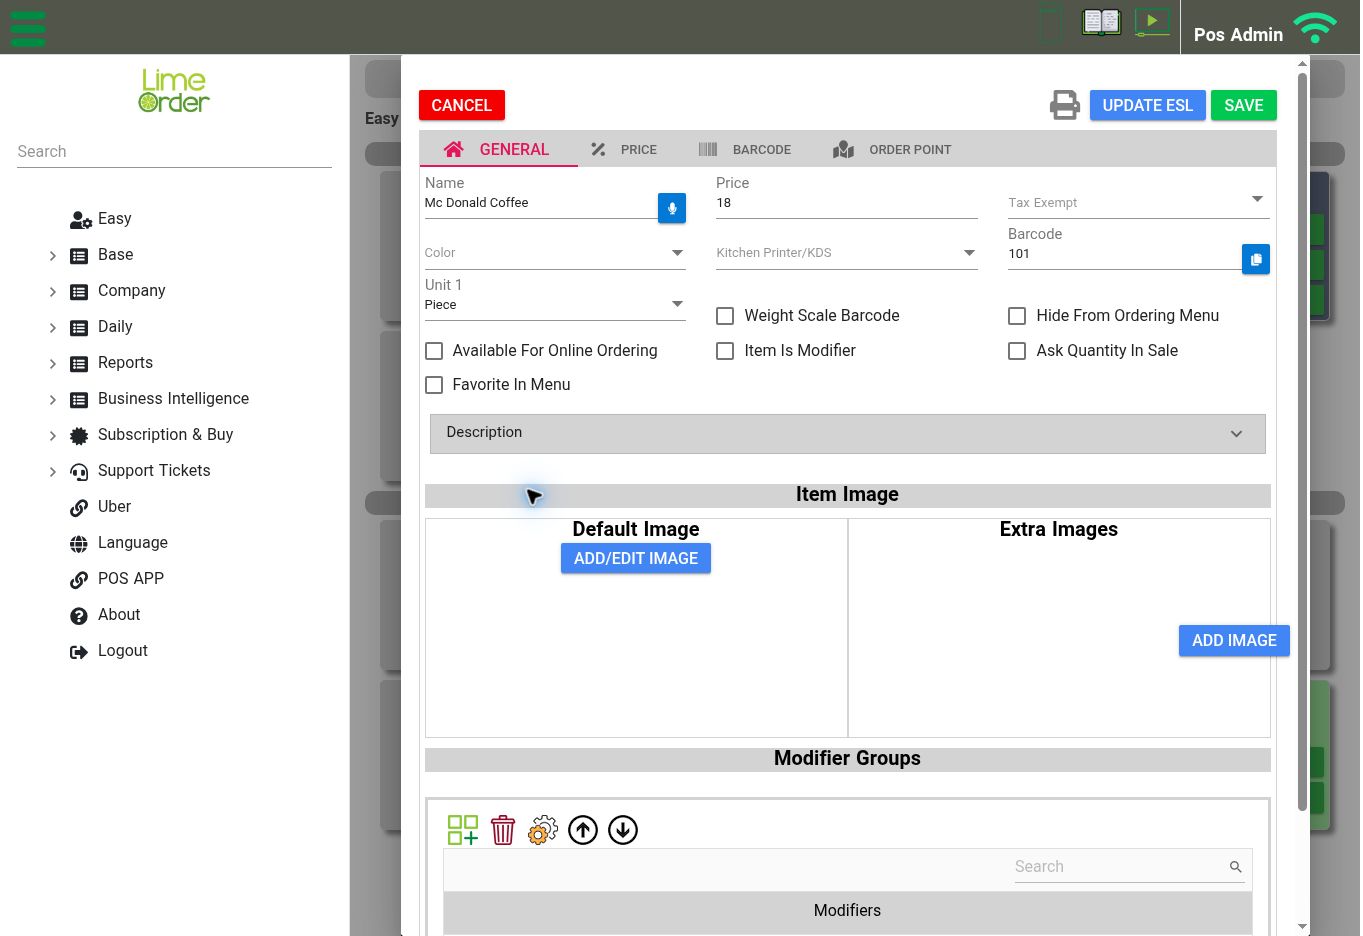
Item General tab: review Kitchen Printer/KDS, barcode, availability options, images, and Modifier Groups. View full-size screenshot
| General field or option | How to use it |
|---|---|
| Name and Price | Enter the product name and its price. |
| Tax Exempt | Review the item’s applicable exemption selection. |
| Color | Choose the product’s colour setting. |
| Kitchen Printer/KDS | Select the configured kitchen destination for this product. |
| Barcode and Unit 1 | Set the barcode and choose the product’s unit. |
| Weight Scale Barcode | Use this option for products configured to use a weight-scale barcode. |
| Hide From Ordering Menu | Controls whether the product is hidden from the ordering menu. |
| Available For Online Ordering | Controls the product’s online-order availability. |
| Item Is Modifier | Identifies the item as a modifier. |
| Ask Quantity In Sale | Enables the product’s quantity prompt option. |
| Favorite In Menu | Marks the product as a menu favourite. |
| Description and Item Image | Expand Description when needed. Use Add/Edit Image for the default image and Add Image for extra images. |
| Modifier Groups | Manage the modifier groups attached to this product using the controls in this section. |
The Items screen also provides Search, Change Items Group, Quick Print, and Batch Print. Use Change Items Group when reorganizing products; use the print controls for the available item printing workflow. Confirm the selected items and destination before completing a batch operation.
4. Prices and price levels #
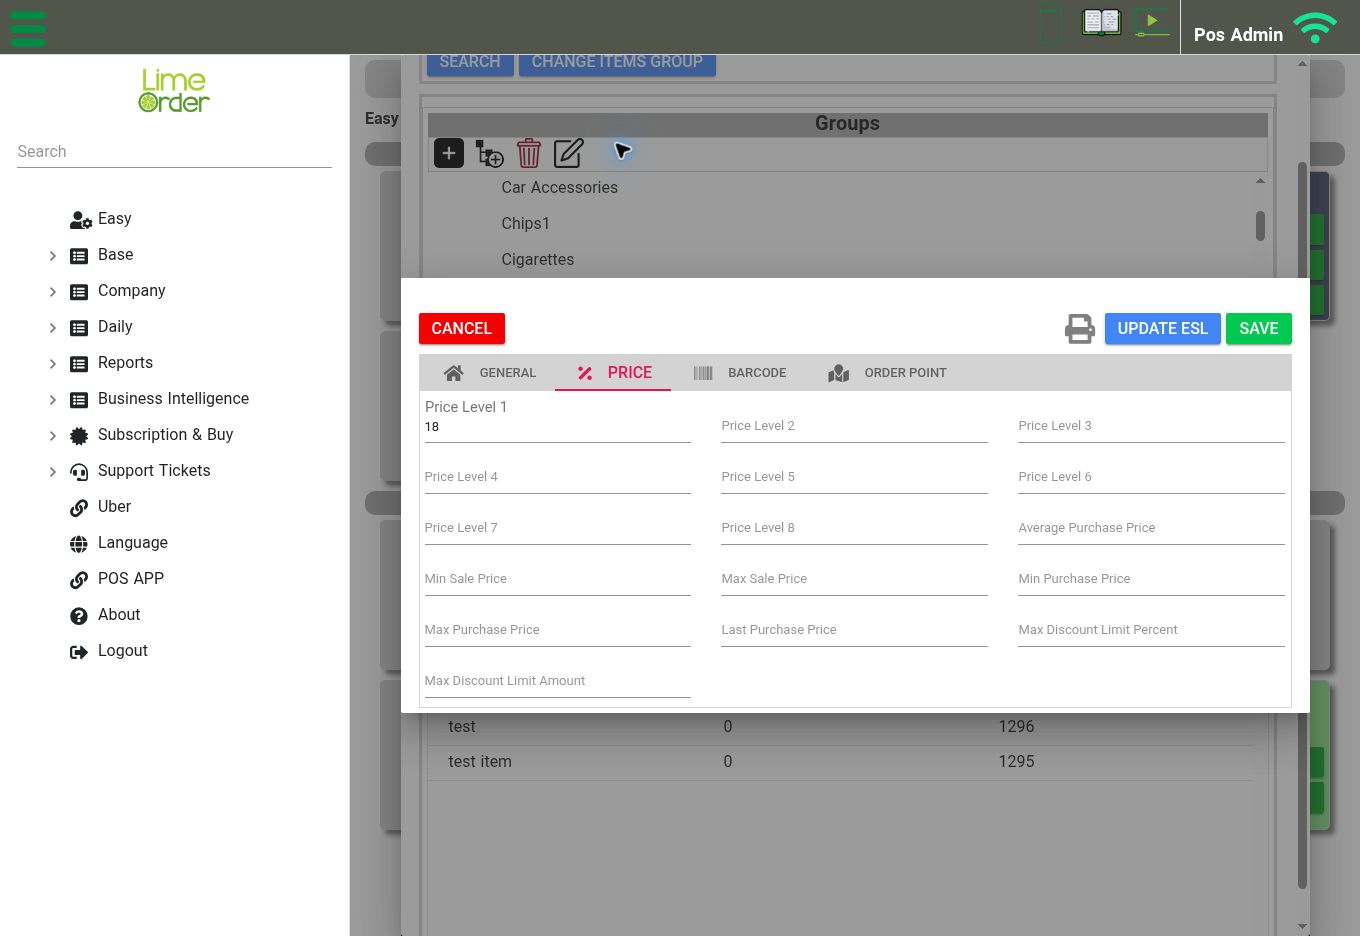
The item’s Price tab contains price levels, purchase prices, and discount limits. View full-size screenshot
Open an item → Price tab
The Price tab provides Price Level 1 through Price Level 8. It also displays fields for Average Purchase Price, minimum/maximum sale and purchase prices, Last Purchase Price, and maximum discount limits by percentage and amount.
- Open the intended item and select Price.
- Review or enter the relevant selling price levels.
- Review the applicable price and discount limits.
- Select Save.
The POS’s Price To Offer In Order setting is under Company → Settings → POS Settings. Check this setting when the POS displays a different price level from the one you expected.
5. Modifier groups and choices #
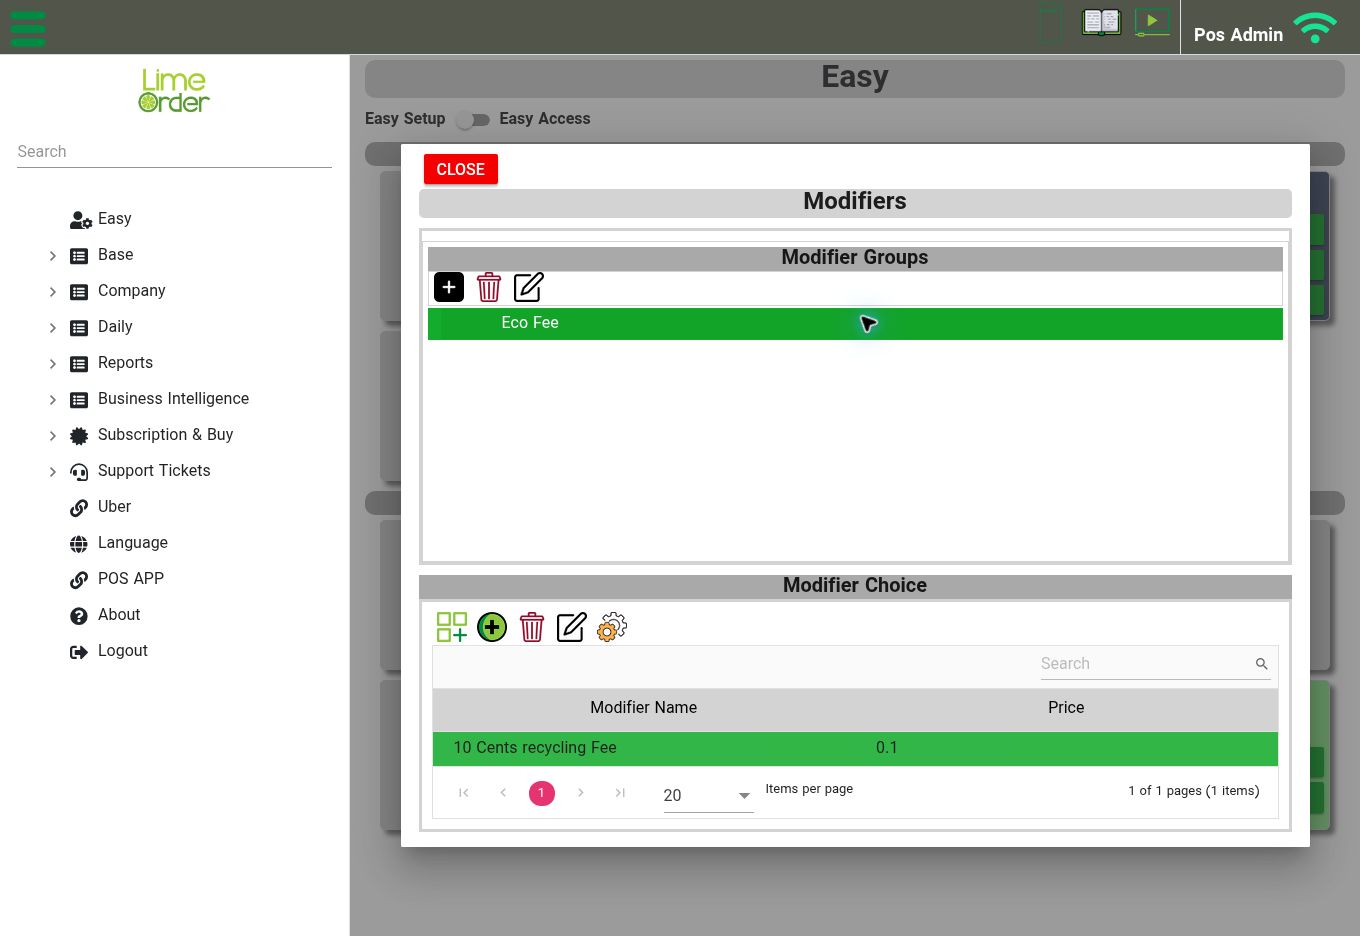
Select a Modifier Group to review the Modifier Choice list and each choice’s price. View full-size screenshot
Open: Easy → Modifiers, or Base → Items → Modifiers
The Modifiers screen separates Modifier Groups from Modifier Choice. The choice list shows Modifier Name and Price.
- Create a modifier group using the group Add/New control. Give it a clear name and save it.
- Select the group.
- Use the choice controls to add an existing choice or create a new choice. Use Edit to review an existing choice.
- Return to the main product’s item editor.
- Under General → Modifier Groups, add the relevant group to the product and save the item.
For a restaurant, useful group names might be “Milk choice,” “Add-ons,” or “Cooking preference.” Set each choice’s price according to your menu. A modifier group must be attached to the relevant product for that product’s configuration.
6. Store settings #
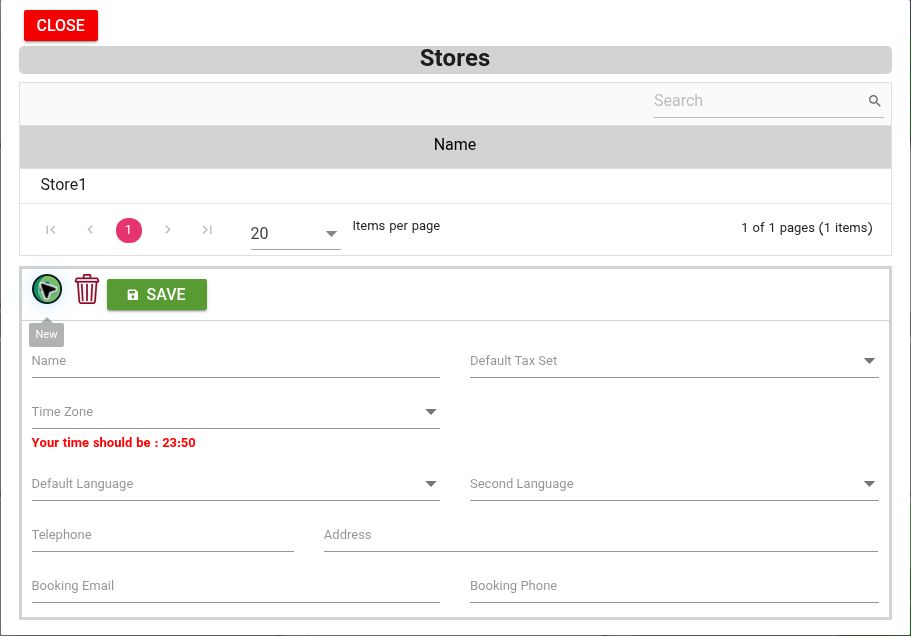
Store form: set the name, tax set, time zone, languages, and business contact details. This example shows an empty form. View full-size screenshot
Open: Easy → Stores, or Company → Stores
- Select a store from the list.
- Review Name, Default Tax Set, and Time Zone.
- Review Default Language, Second Language, Telephone, and Address.
- Review Booking Email and Booking Phone if used.
- Select Save.
The screen displays “Your time should be” beside the time zone setting. Use this as a check that the store’s configured time zone is appropriate. The store list also has Add/New and Delete controls.
7. Ordering devices #
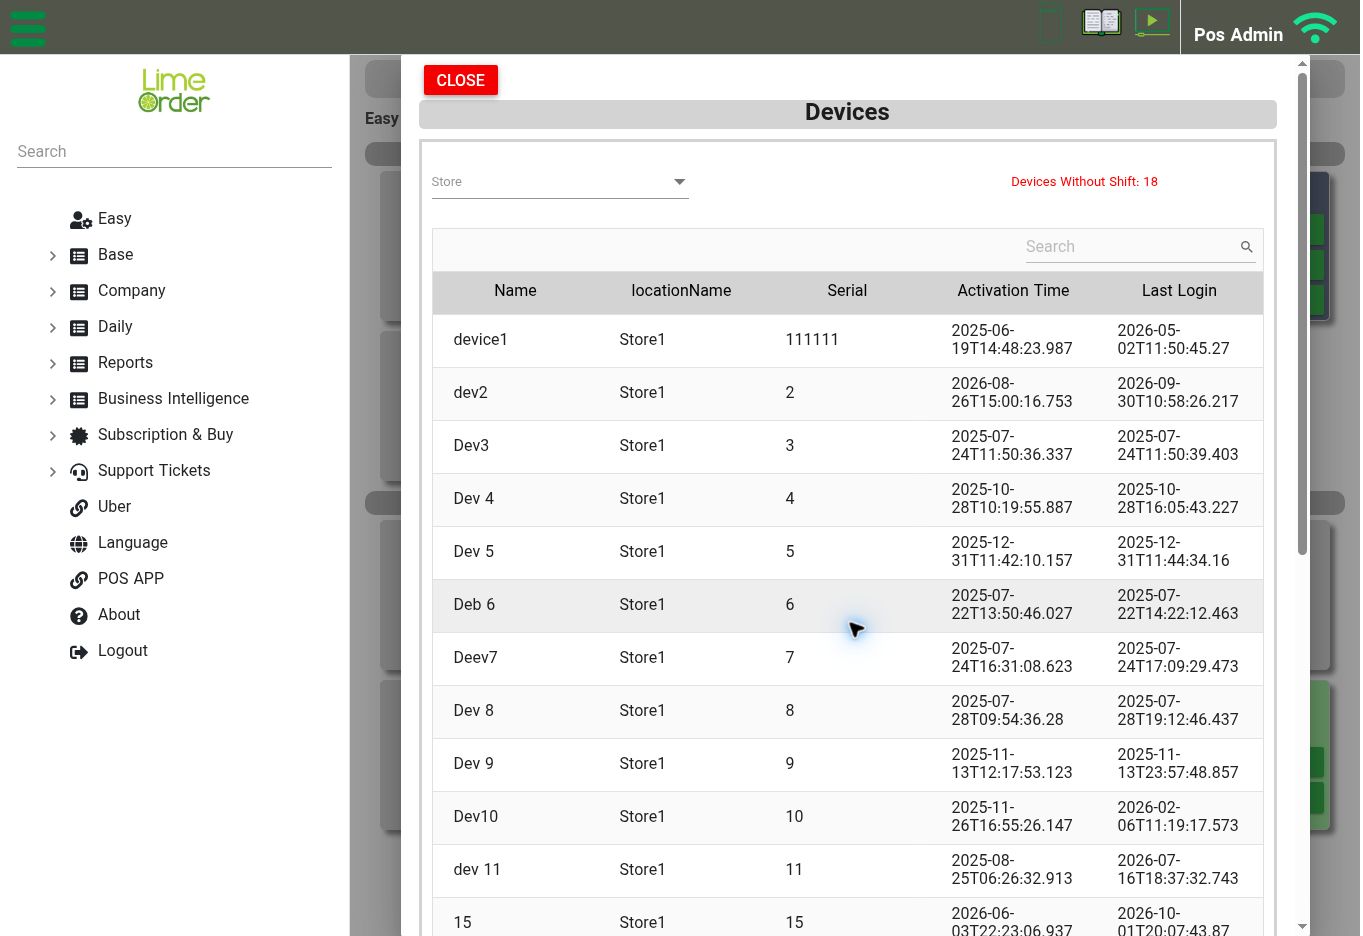
Devices list: use the Store filter and review the device’s name, serial, activation time, and last login. View full-size screenshot
Open: Easy → Ordering Devices, or Company → Devices
The Devices screen includes a Store filter and lists device name, store, serial, activation time, and last login. Select a device to review its detail form.
- Find and select the intended device.
- Review Name, Serial, and Store.
- Review Shift Is Mandatory and the Disabled switch.
- Select Save if you changed the configuration.
Activation Time and Last Login appear as read-only fields. The screen also shows a count of devices without a shift and has a Release control. Use Release only when you intend to release the selected device’s activation; if you are unsure about its effect on that device, contact support before using it.
8. Kitchen printers and product routing #
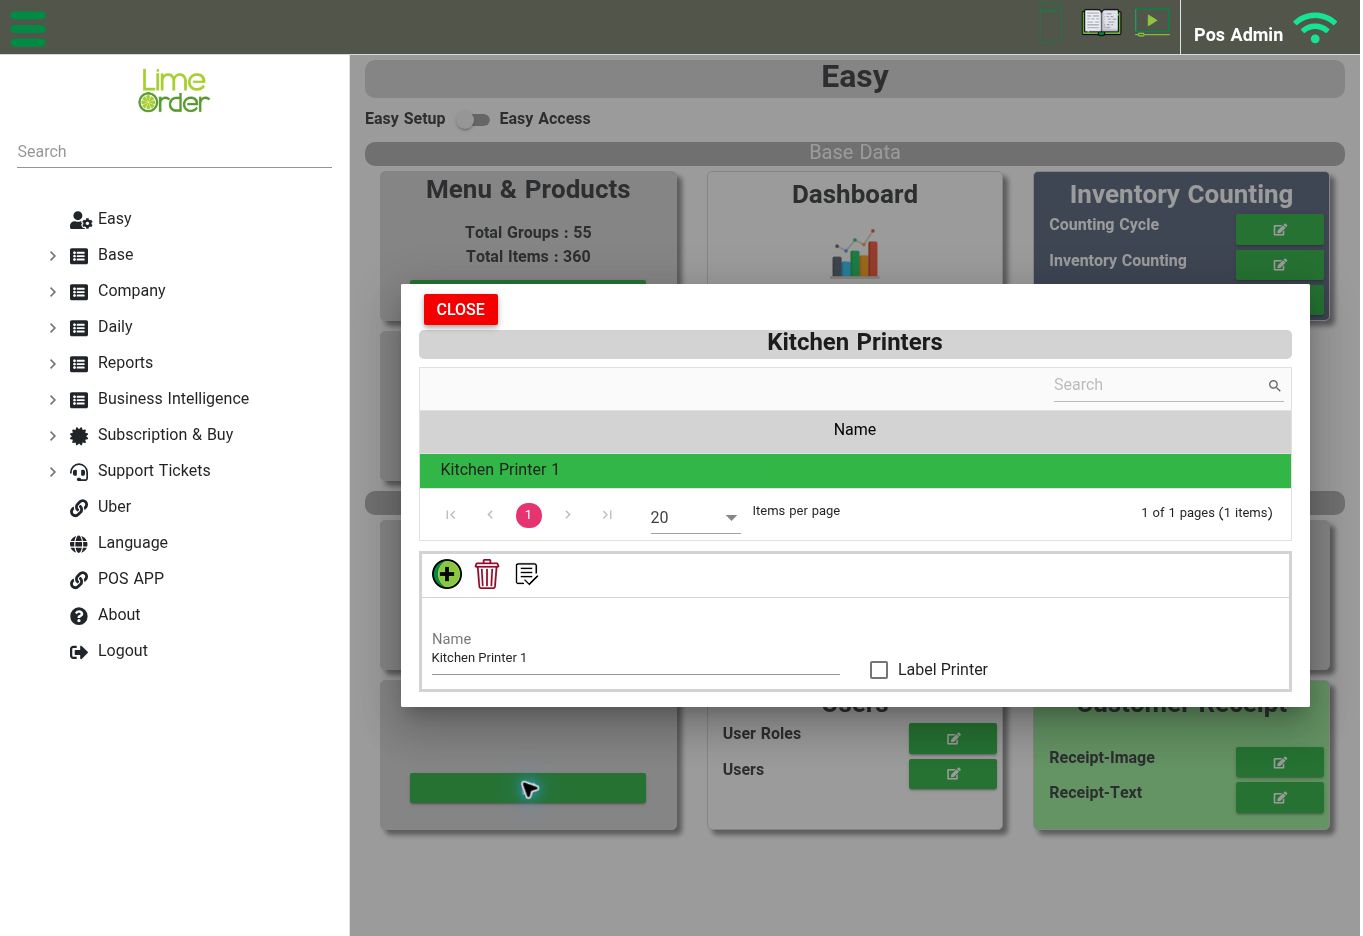
Kitchen Printers: select a printer record to review its name and Label Printer option. View full-size screenshot
Open: Easy → Kitchen Printers
- Select an existing kitchen printer record or use Add/New.
- Set its Name.
- Review the Label Printer checkbox when configuring a label printer.
- Save the record.
- Open each relevant product and select its destination in General → Kitchen Printer/KDS.
- Save the product and check a sample order on the configured POS and kitchen destination.
Use clear destination names such as Kitchen or Drinks Station. The Kitchen Printers form reviewed here defines the logical name and label-printer option. Physical printer connectivity and the KDS device’s own setup must also be configured for your installation.
9. User roles and users #
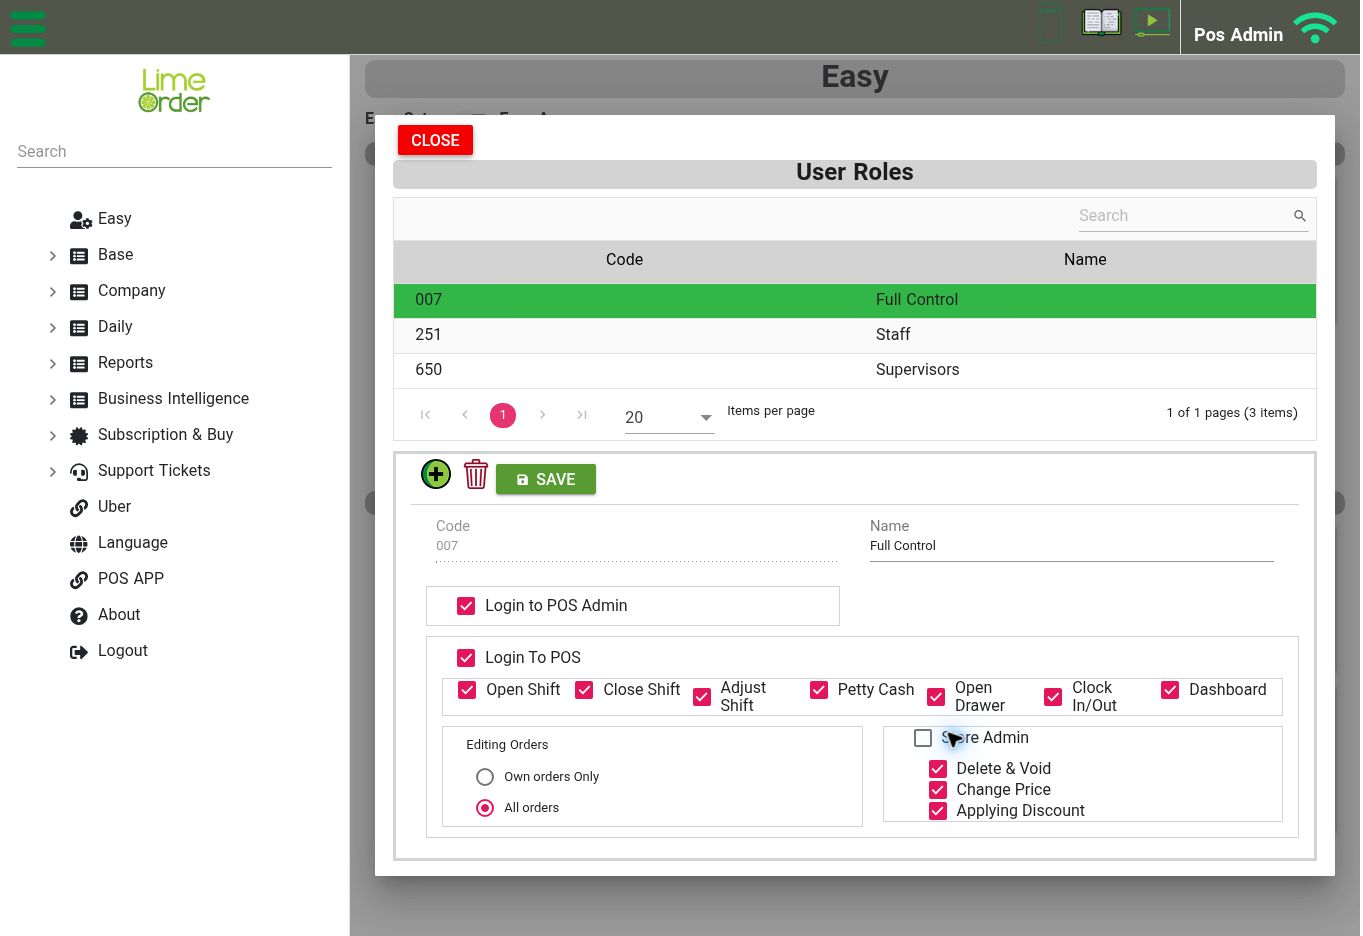
User Roles: review login permissions, shift actions, order editing, and discount permissions before assigning a role. View full-size screenshot
Set up a role #
Open: Easy → Users → User Roles
- Select the role you want to review, or use Add/New to create a role.
- Set the role’s Name.
- Review the permissions and order-editing scope.
- Select Save.
The role form includes Login to POS Admin, Login To POS, Open Shift, Close Shift, Adjust Shift, Petty Cash, Open Drawer, Clock In/Out, and Dashboard.
Editing Orders offers Own orders Only or All orders. Other controls include Store Admin, Delete & Void, Change Price, and Applying Discount. Assign permissions according to the staff member’s responsibilities.
Assign a user #
Open: Easy → Users → Users
- Select the user, or use Add/New.
- Choose the user’s Roles and review Name and Email(Login Name).
- Review the appropriate sign-in settings: POS Admin password and POS PIN Code are separate fields. Staff Booking also has its own password field.
- Under Has Access To, choose All Locations or Single Location and review the location selection.
- Review other relevant fields, including Email CC, Hourly Salary, Overtime Salary, and Booking Color.
- Select Save.
Use individual staff accounts where appropriate. Keep passwords and PINs private. A user’s role determines which actions they are allowed to perform.
10. POS, kiosk, and KDS settings #
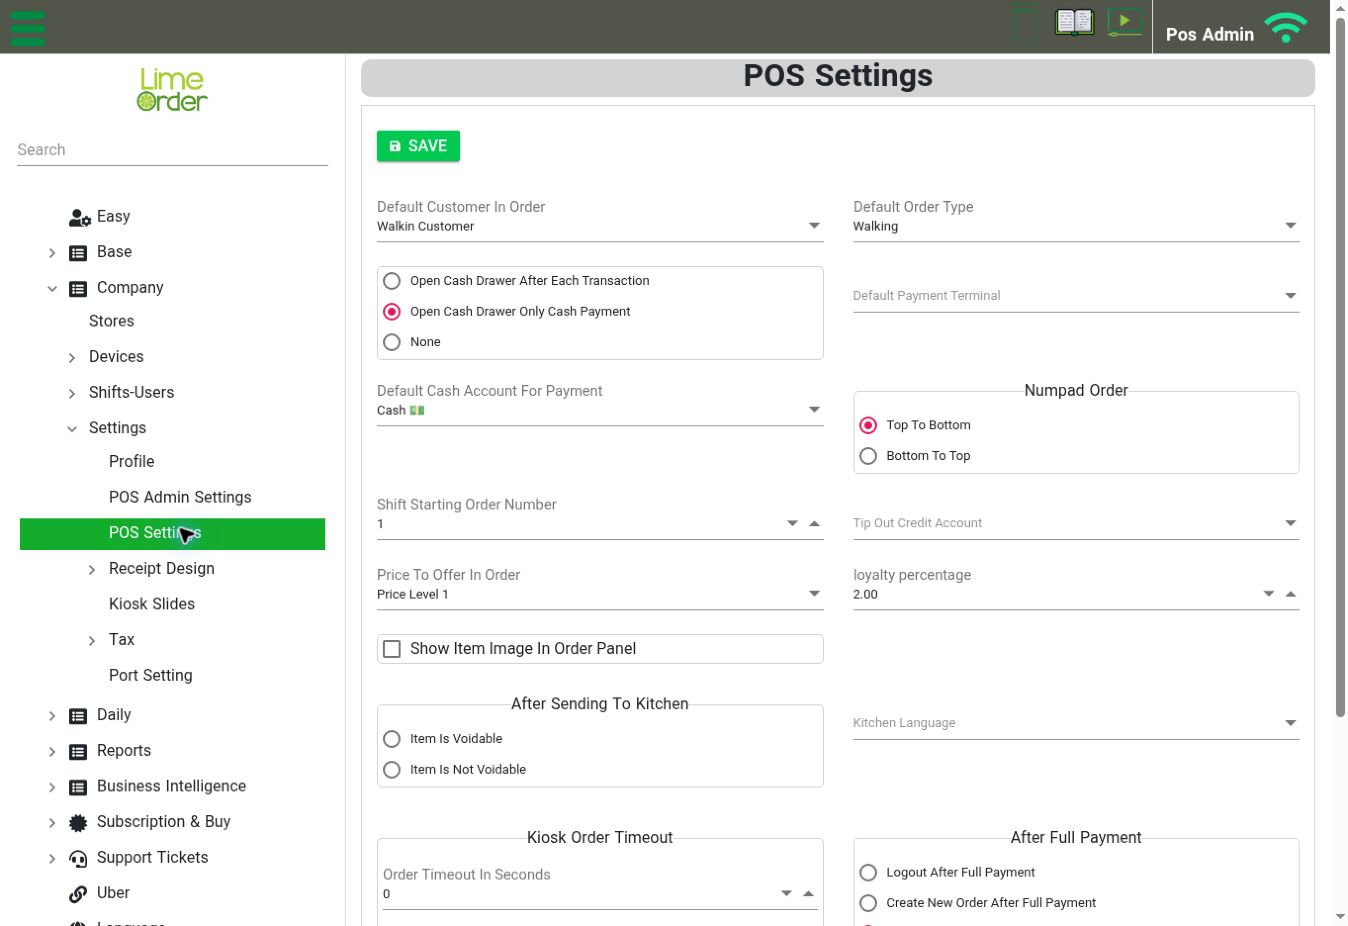
POS Settings: review order defaults, cash drawer behavior, payment defaults, and Price To Offer In Order. View full-size screenshot
Open: Company → Settings → POS Settings
This screen controls common ordering behaviour. Review the settings required for your installation, then select Save.
| Area | Controls on the screen |
|---|---|
| Order defaults | Default Customer In Order, Default Order Type, Price To Offer In Order, Shift Starting Order Number, and Show Item Image In Order Panel. |
| Cash drawer | Open Cash Drawer After Each Transaction, Open Cash Drawer Only Cash Payment, or None. |
| Payment defaults | Default Payment Terminal, Default Cash Account For Payment, and Tip Out Credit Account. |
| Other order settings | Numpad Order and loyalty percentage. |
| Kitchen | After Sending To Kitchen: Item Is Voidable or Item Is Not Voidable; Kitchen Language. |
| Kiosk Order Timeout | Order Timeout In Seconds and Alert Duration In Seconds. |
| After Full Payment | Logout After Full Payment, Create New Order After Full Payment, or None. |
| KDS Preparation Time | Short Delay (Second) and Late (Second). |
| KDS Serve Time | Short Delay (Second) and Late (Second). |
Match kitchen and KDS timing values to your operation. After changing order behaviour, check a sample workflow on the appropriate device. The Settings menu also includes Profile, POS Admin Settings, Receipt Design, Kiosk Slides, Tax, and Port Setting.
11. Tax configuration #
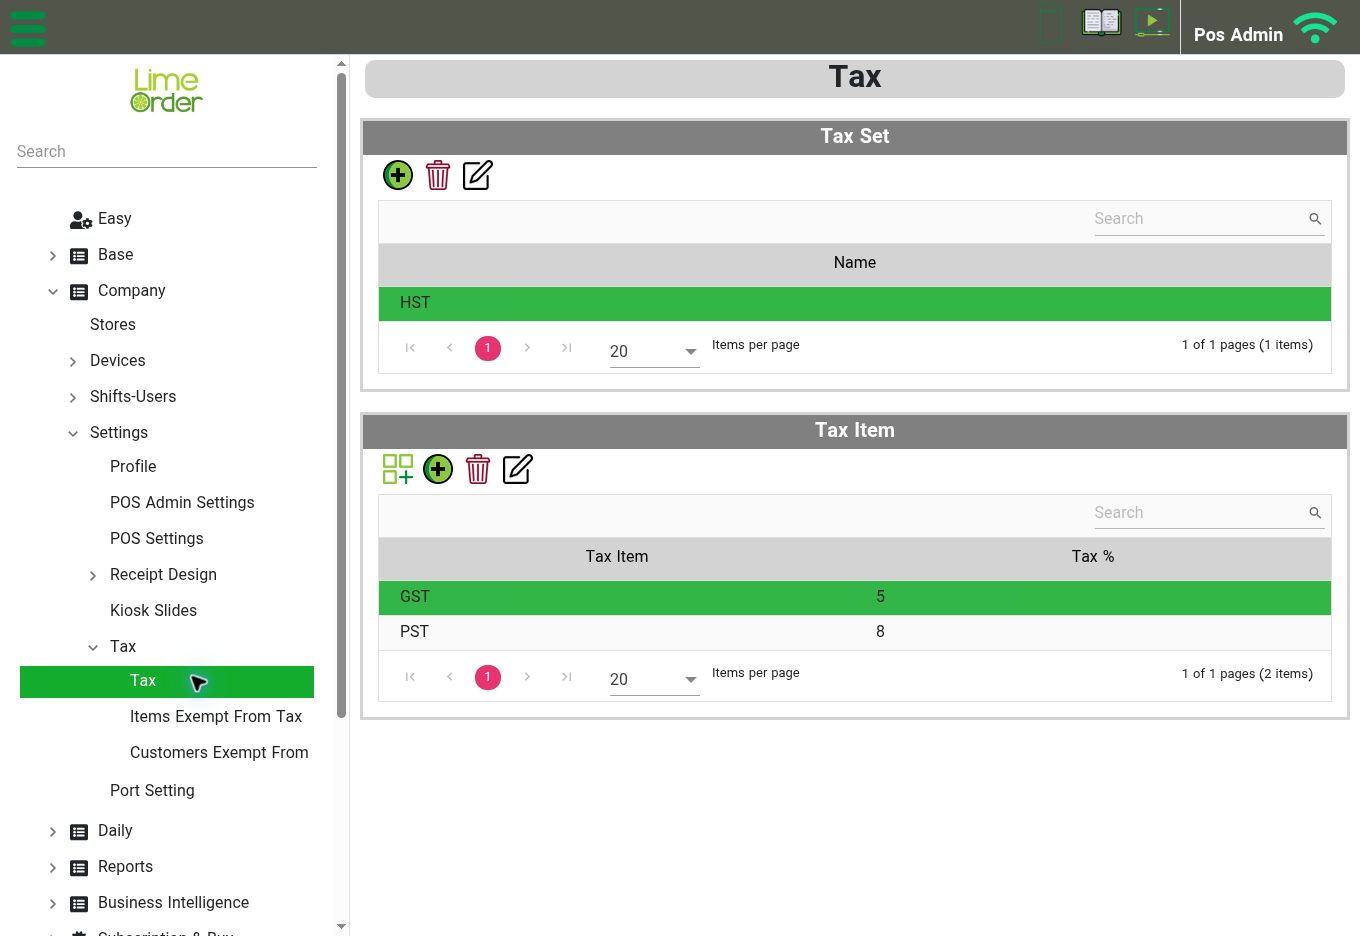
Select a Tax Set to review its Tax Items. The values shown are examples from this account, not recommended rates. View full-size screenshot
Open: Company → Settings → Tax → Tax
The Tax screen contains a Tax Set list and a Tax Item list. Tax items are shown with their Tax %. Select the tax set before reviewing its associated tax items.
- Review the appropriate Tax Set.
- Use the available Add/New or Edit controls to maintain the required tax configuration.
- Check the store’s Default Tax Set under Company → Stores.
- Review item-specific exemptions in the item form and the exemption screens when applicable.
- Check a sample receipt to confirm the resulting calculation.
The Tax branch also includes Items Exempt From Tax and Customers Exempt From Tax. Use the tax rates and exemptions applicable to your business; this guide describes the interface and does not prescribe rates.
12. Customer receipt text #
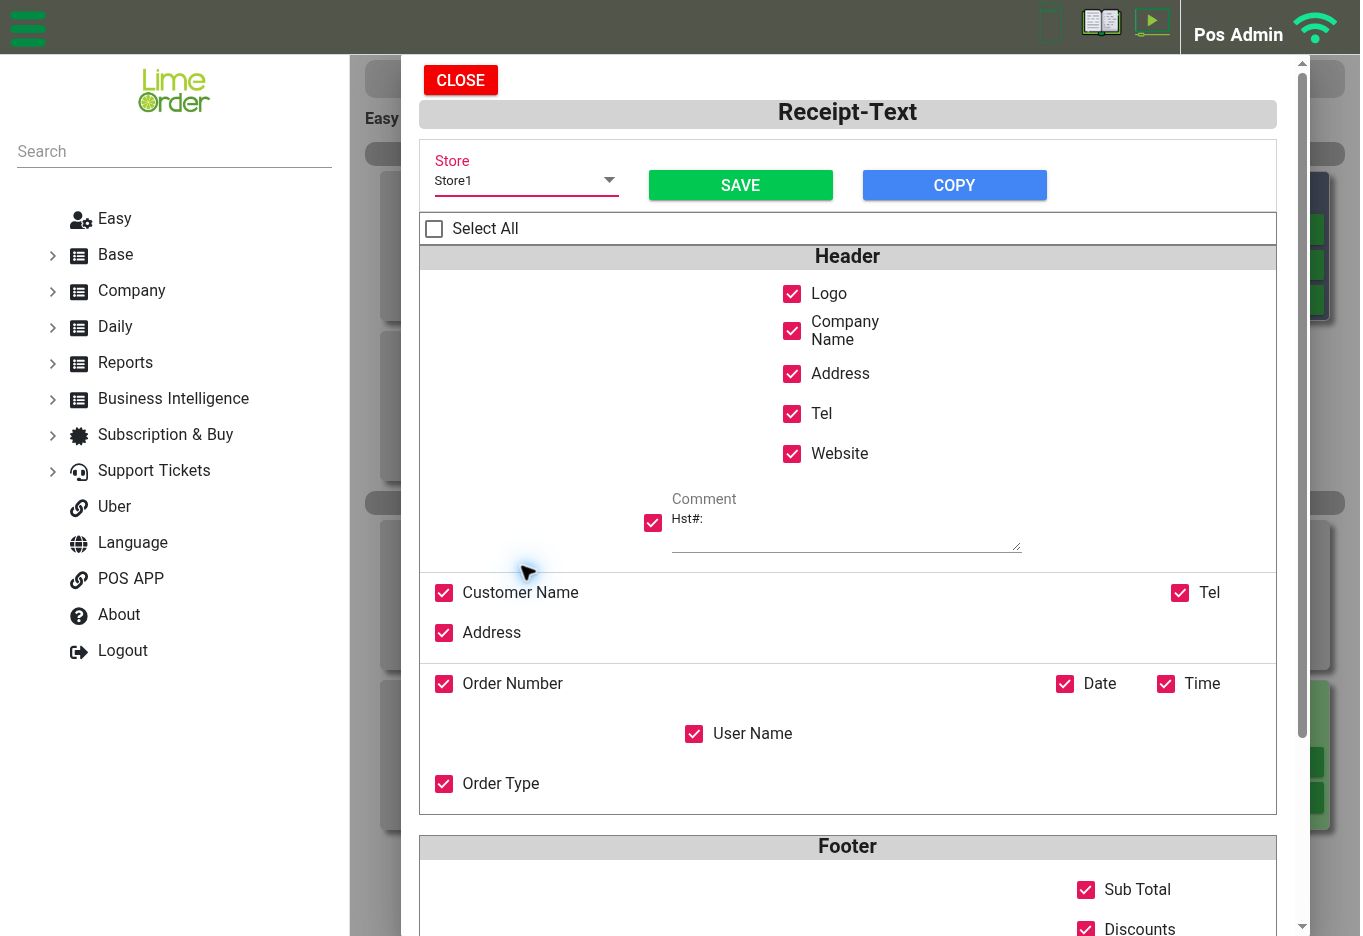
Receipt-Text: select the store first, then review the Header options. Scroll down for Footer options. View full-size screenshot
Open: Easy → Customer Receipt → Receipt-Text
- Select the Store. The receipt controls appear after selecting a store.
- Review the Header fields you want to include.
- Review the Footer fields and comments.
- Select Save.
- Check a sample printed receipt on the store’s POS.
Header options include Logo, Company Name, Address, Tel, Website, a comment, customer name/contact details, order number, date, time, user name, and order type.
Footer options include Sub Total, Discounts, Surcharges, Tax, Total, and a comment. The screen also includes Select All and Copy. Review the target store carefully when copying a receipt configuration.
Receipt-Image is available as a separate shortcut beside Receipt-Text on the Easy page.
13. Inventory counting #
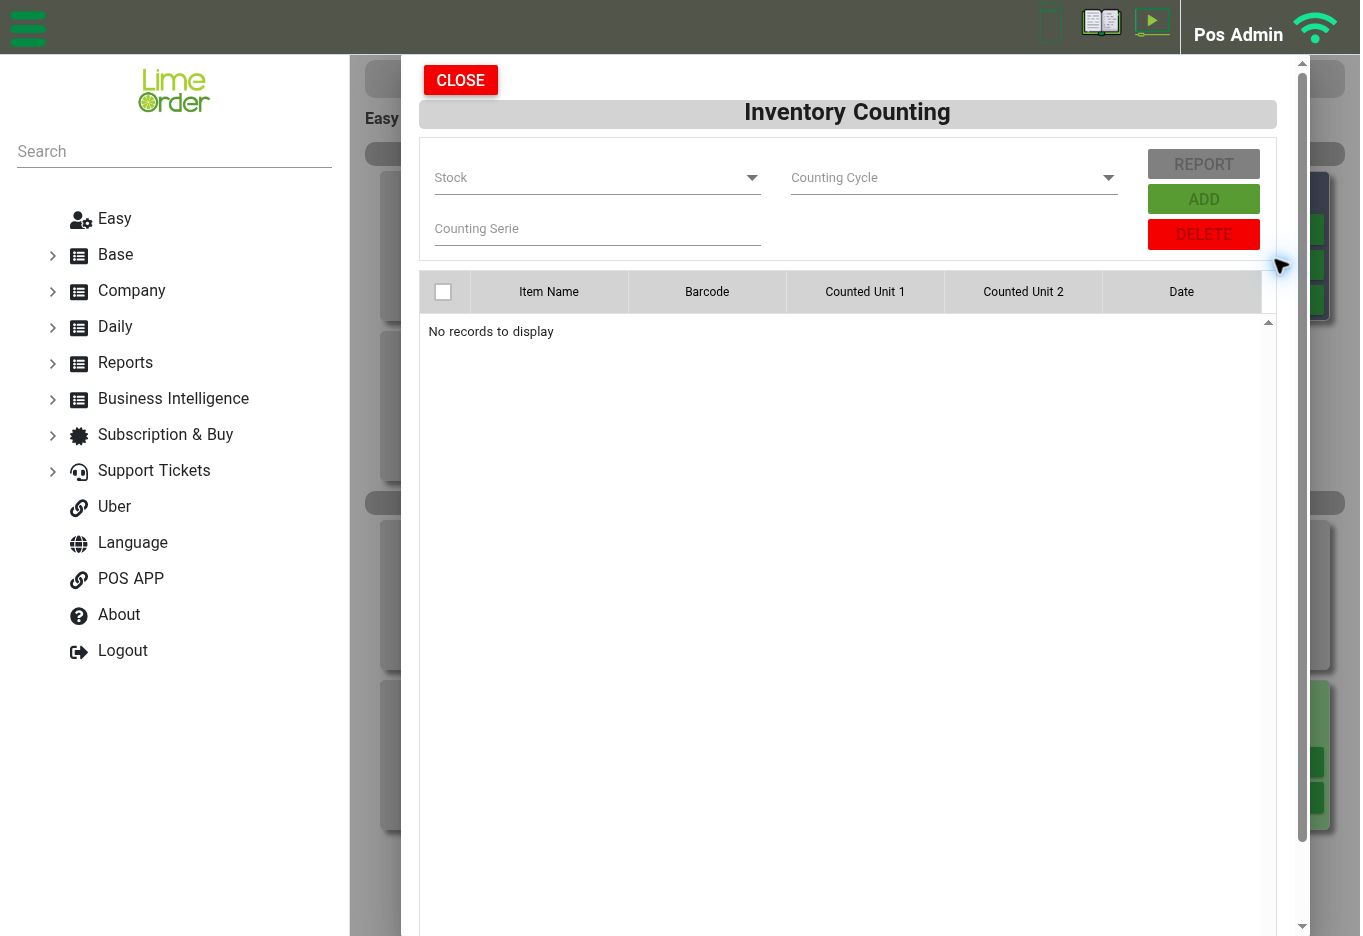
Inventory Counting: choose Stock, Counting Cycle, and Counting Serie to enable the count actions. View full-size screenshot
Open: Easy → Inventory Counting
Prepare a counting cycle #
- Open the Counting Cycle shortcut.
- Use Add/New to create a cycle, or select an existing cycle and use Edit.
- Give the cycle a meaningful name, such as “October stock count,” and save it.
Open the inventory count #
- Open the Inventory Counting shortcut.
- Select Stock.
- Select Counting Cycle.
- Complete Counting Serie for the count you are working on.
- When available, use Add to enter count records and follow the entry form.
- Review the list’s Item Name, Barcode, Counted Unit 1, Counted Unit 2, and Date columns.
- Use Report to review the count. A separate Report shortcut is also available on the Easy page.
The Add, Delete, and Report controls may be disabled until the required count selections are complete. Keep the stock, cycle, and series consistent for the count you are reviewing. Do not interpret an empty count list as a completed count.
14. Item-level promotions #
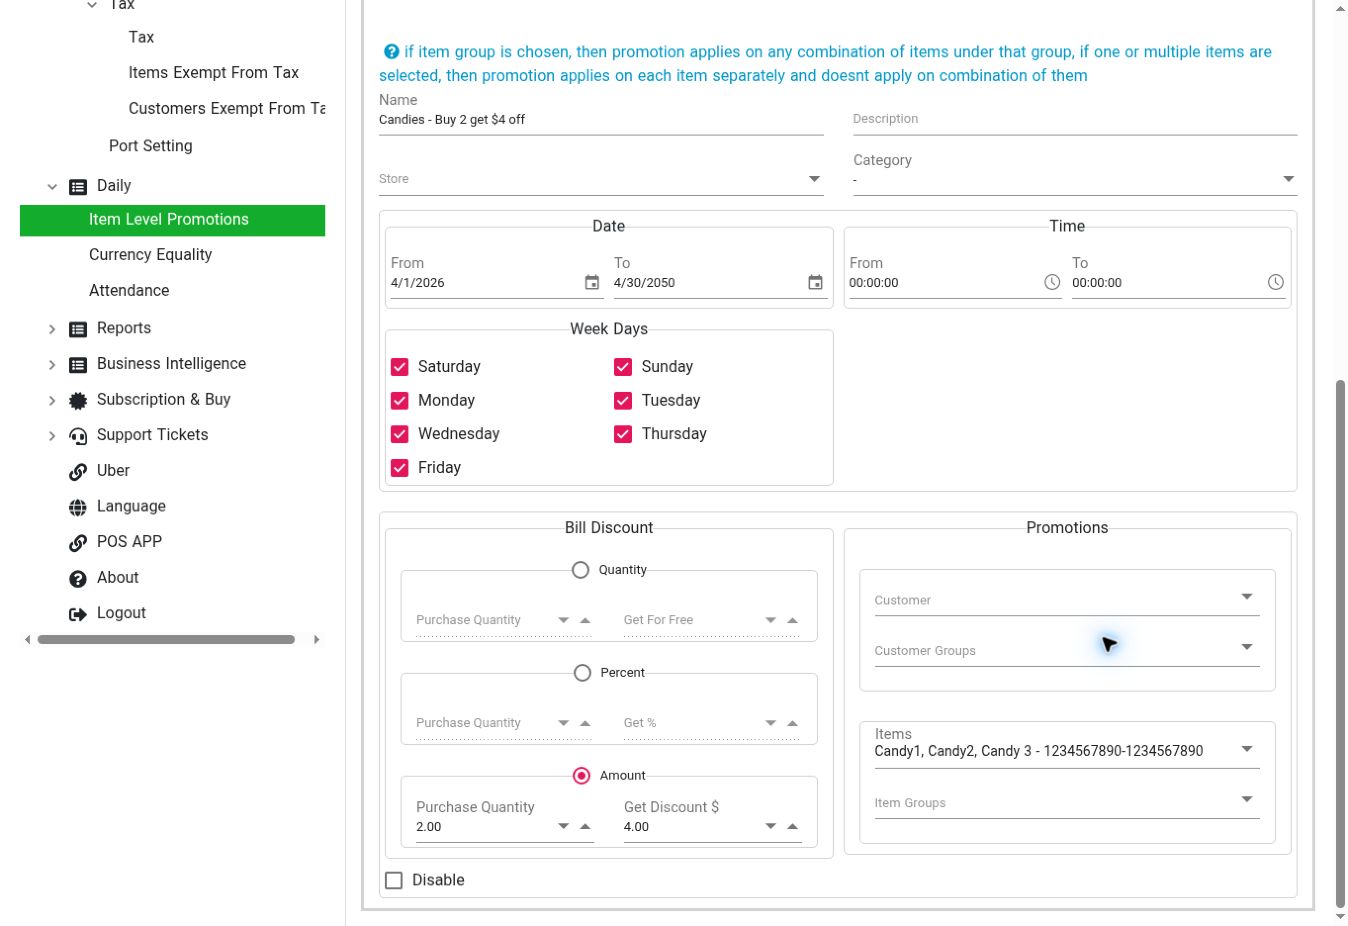
Promotion form: configure dates, weekdays, a discount method, and eligible items or groups. View full-size screenshot
Open: Daily → Item Level Promotions
- Use the Status filter and list search to find an existing promotion, or use Add/New to create one.
- Review Name, Description, Store, and Category.
- Set the date range, time range, and applicable Week Days.
- Choose the discount method and enter the associated purchase quantity and benefit.
- Review the Customer, Customer Groups, Items, and Item Groups selections.
- Review the Disable checkbox, then save.
- Check qualifying and non-qualifying sample orders on the POS.
| Method | Fields |
|---|---|
| Quantity | Purchase Quantity and Get For Free. |
| Percent | Purchase Quantity and Get %. |
| Amount | Purchase Quantity and Get Discount $. |
Important promotion rule shown in the app: selecting an item group applies the promotion to combinations of items under that group. Selecting individual items applies it to each item separately, rather than a combination of different selected items.
For example, choose a group when customers may mix products from that group to qualify. Check dates, weekdays, store, and qualifying items if a promotion does not apply as expected.
15. End-of-day reports and exports #
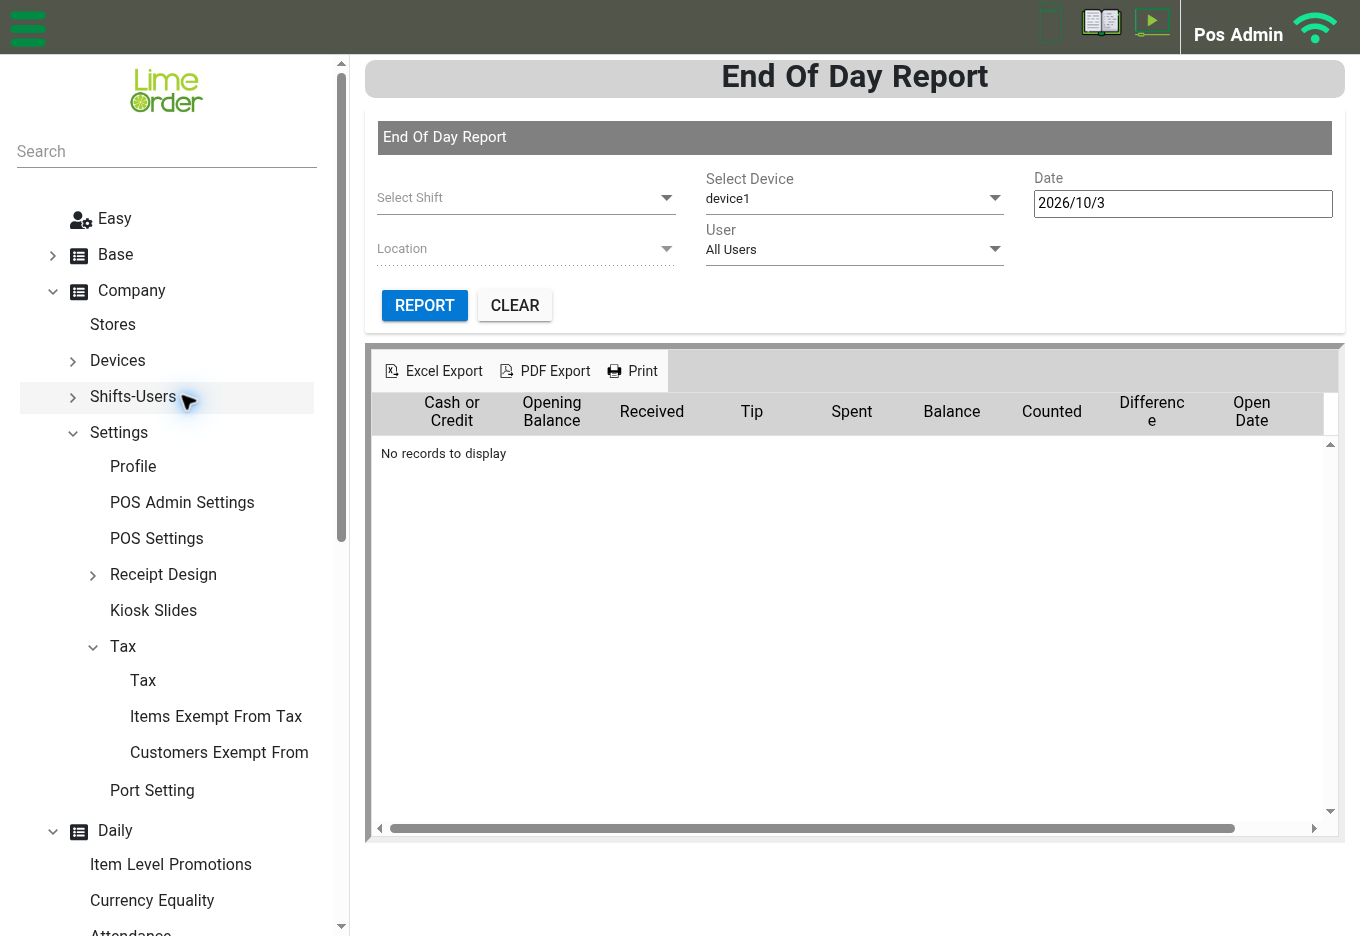
End Of Day Report: set filters, select Report, then use Excel Export, PDF Export, or Print. View full-size screenshot
Open: Reports → Daily Report → End Of Day Report
- Review Select Device, Date, Select Shift, and User.
- Review the location filter where available.
- Select Report.
- Review the results before exporting.
- Use Excel Export, PDF Export, or Print as needed.
- Select Clear when you want to reset the filters.
The result grid includes Cash or Credit, Opening Balance, Received, Tip, Spent, Balance, Counted, Difference, Open Date, and Close Time.
The Daily Report branch also includes End Of Day Report – Non Shift, Best Selling Days, and Best Selling Hours. Choose the report that matches the question you are investigating.
“No records to display” means no records are currently shown for that view. Review the date, device, shift, user, and location selections before concluding that there was no activity.
16. Business Intelligence #
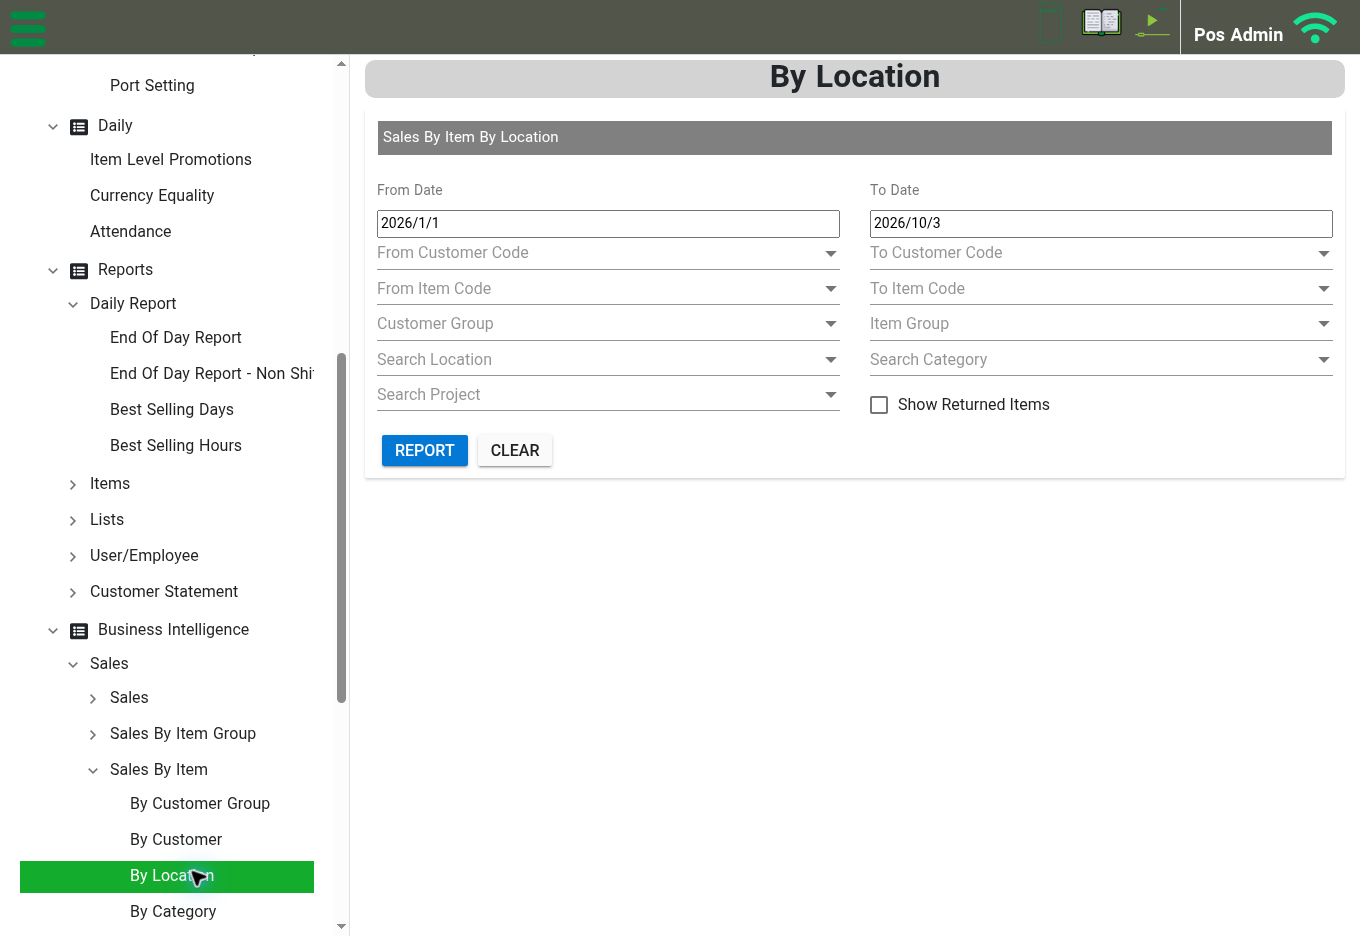
Sales By Item By Location: choose the date range and optional filters, then select Report. View full-size screenshot
Open: Business Intelligence → Sales
The Sales branch includes Sales, Sales By Item Group, Sales By Item, Sales By Customer Group, Sales By Customer, Sales By Location, Sales By Category, and Sales By Project. Expand the branch you need to find its further breakdowns.
Example: sales by item and location #
Business Intelligence → Sales → Sales By Item → By Location
- Set From Date and To Date.
- Review the customer range, item range, customer group, item group, location, category, and project selectors as needed.
- Review Show Returned Items.
- Select Report to request the analysis.
- Use Clear to reset the selections.
Keep the same date range and return-item selection when comparing results. The Business Intelligence menu also has a Purchase branch; choose its available analysis according to your reporting task.
17. Troubleshooting and support #
Find chat in the top bar and Support Tickets in the sidebar when you need help. View full-size screenshot
| Issue | What to check |
|---|---|
| Cannot sign in | Confirm the account’s email address and use Forget Password ? if needed. Ask your administrator to review the assigned role’s Login to POS Admin permission. |
| A menu or action is unavailable | Review the user’s role and location access. Available options can depend on account configuration. |
| An item is missing from the ordering menu | Find the item in its group, review Hide From Ordering Menu, and confirm that you saved the intended item. |
| An item is unavailable online | Review Available For Online Ordering in the item’s General tab and check your online-ordering configuration. |
| The POS offers the wrong price | Compare the item’s Price tab with POS Settings → Price To Offer In Order. |
| Modifier choices are missing | Check the choices inside the modifier group and the Modifier Groups attached to the product. |
| A kitchen item goes to the wrong destination | Review the product’s Kitchen Printer/KDS selection, the kitchen printer record, and the physical device configuration. |
| A promotion does not apply | Check Disable, date/time ranges, weekdays, store, customer restrictions, and the difference between selecting Items and Item Groups. |
| Receipt details are incorrect | Check the selected store’s details and Receipt-Text configuration, then save and check a sample receipt. |
| A report is empty | Review the filters and select Report. Check whether the report should use a shift or the Non Shift option. |
| Inventory count actions are disabled | Complete Stock, Counting Cycle, and Counting Serie selections. |
Use chat in the top bar or the Support Tickets sidebar section for help. Include the screen name, store/device involved, what you expected, and what happened. Share screenshots of the issue without passwords, PINs, payment details, or private customer information.